Ardustat
Overview
Last month I finally finished my first real Arduino project—a web-controlled thermostat. It’s pretty much the “Hello World” of Arduino home automation projects, but hey, we all start somewhere.
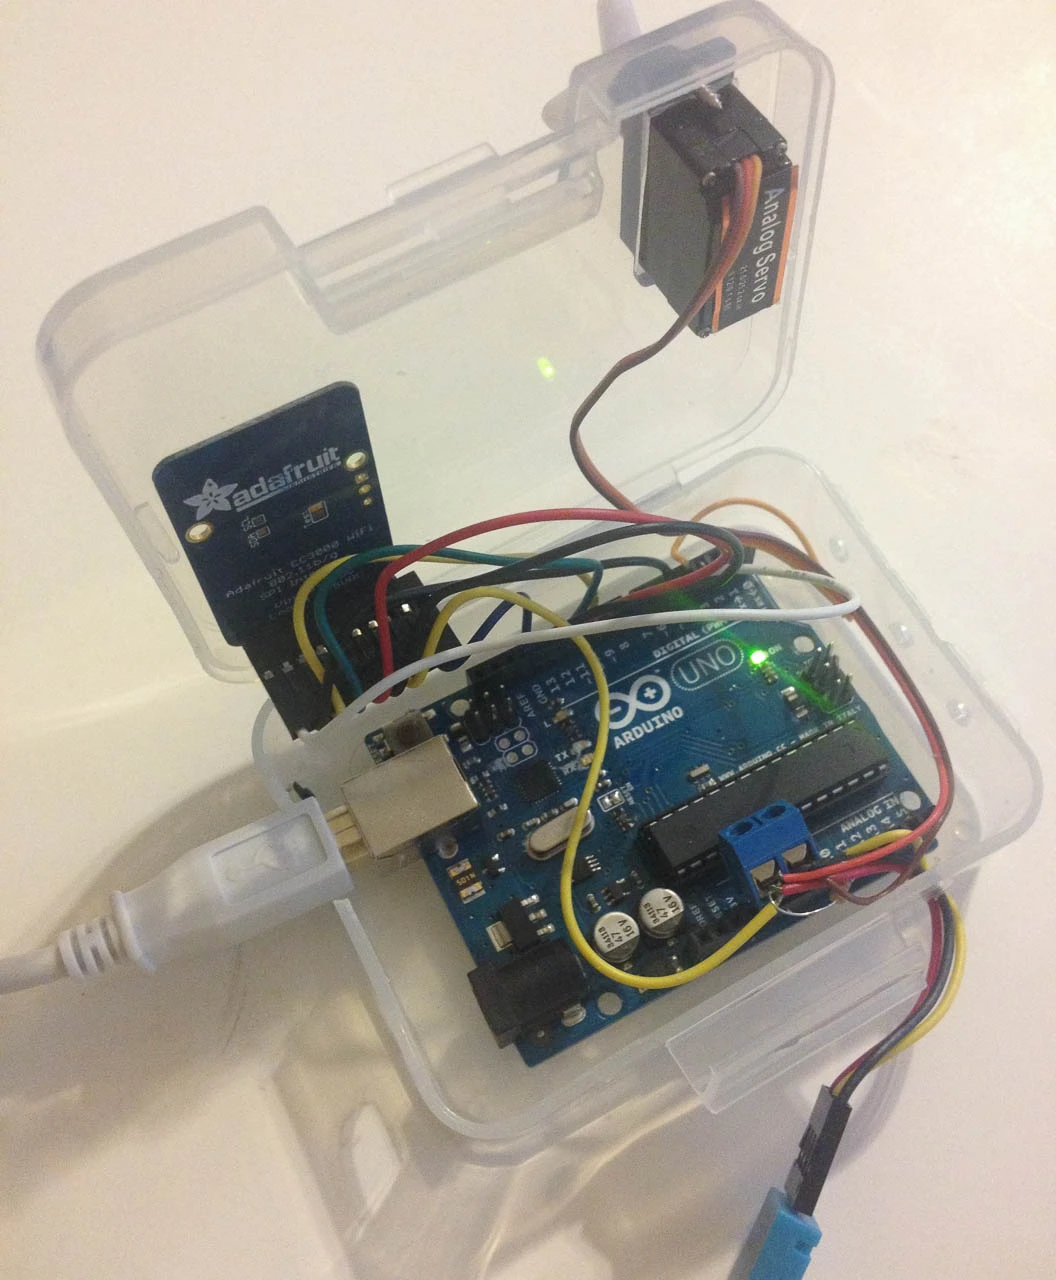
What’s Inside
- Adafruit CC3000 WiFi Breakout Board
- Arduino Uno R3
- Generic Hobby Servo Motor
- 1 10k Resistor
- 1 Paperclip (yes, really!)
- 1 DHT11 Temperature Humidity Sensor
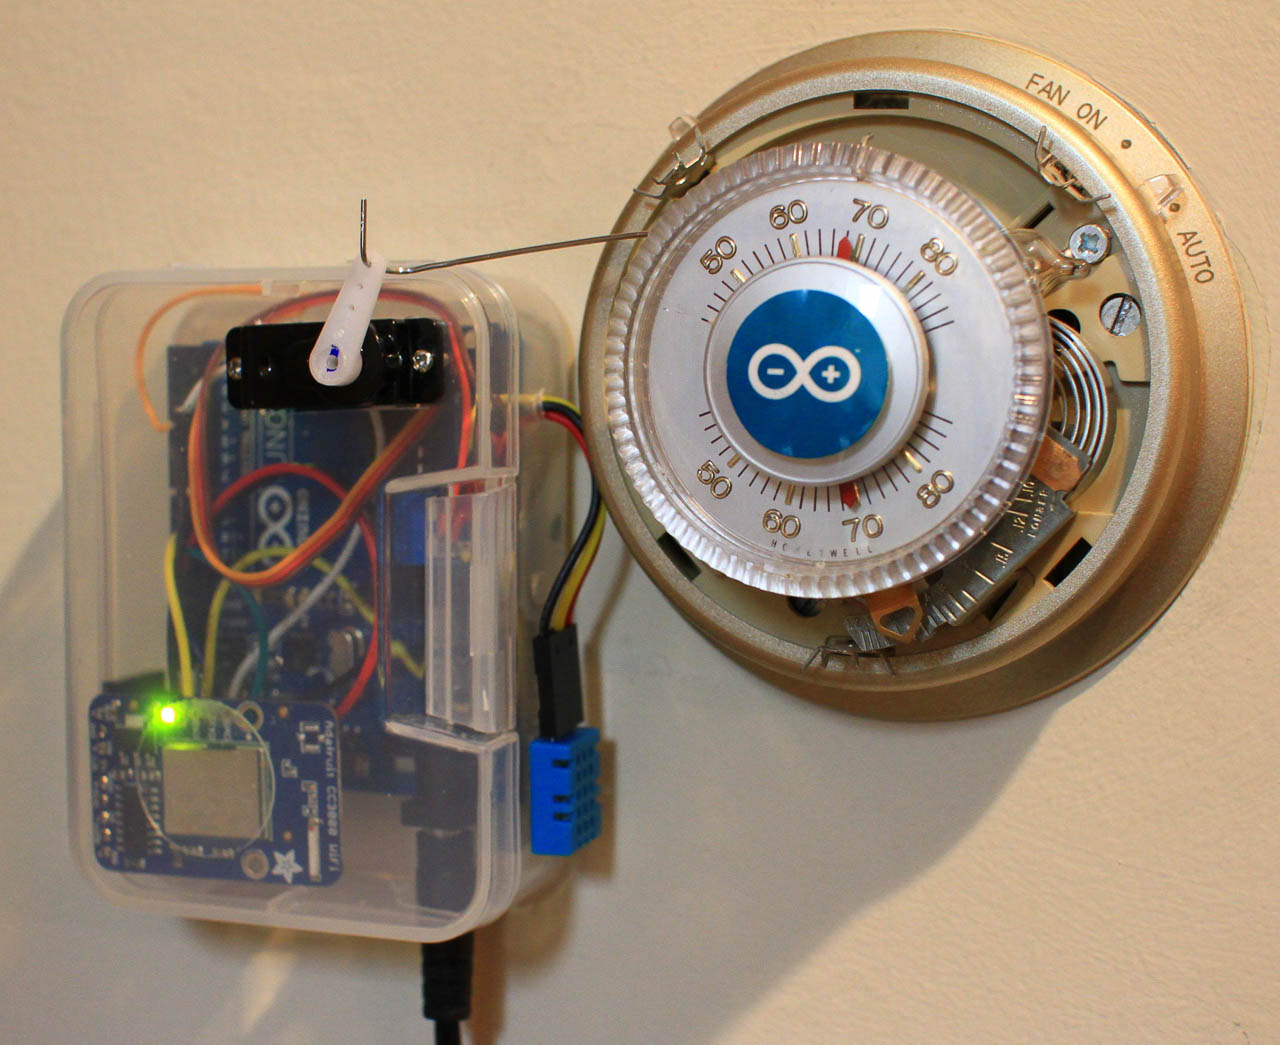
Why Not Just Replace the Thermostat?
Since I’ve got a perfectly good Honeywell T87 thermostat and I’m renting (no major modifications allowed!), I decided to build a removable interface instead of going the more elegant relay route. Sometimes you gotta work with what you’ve got.
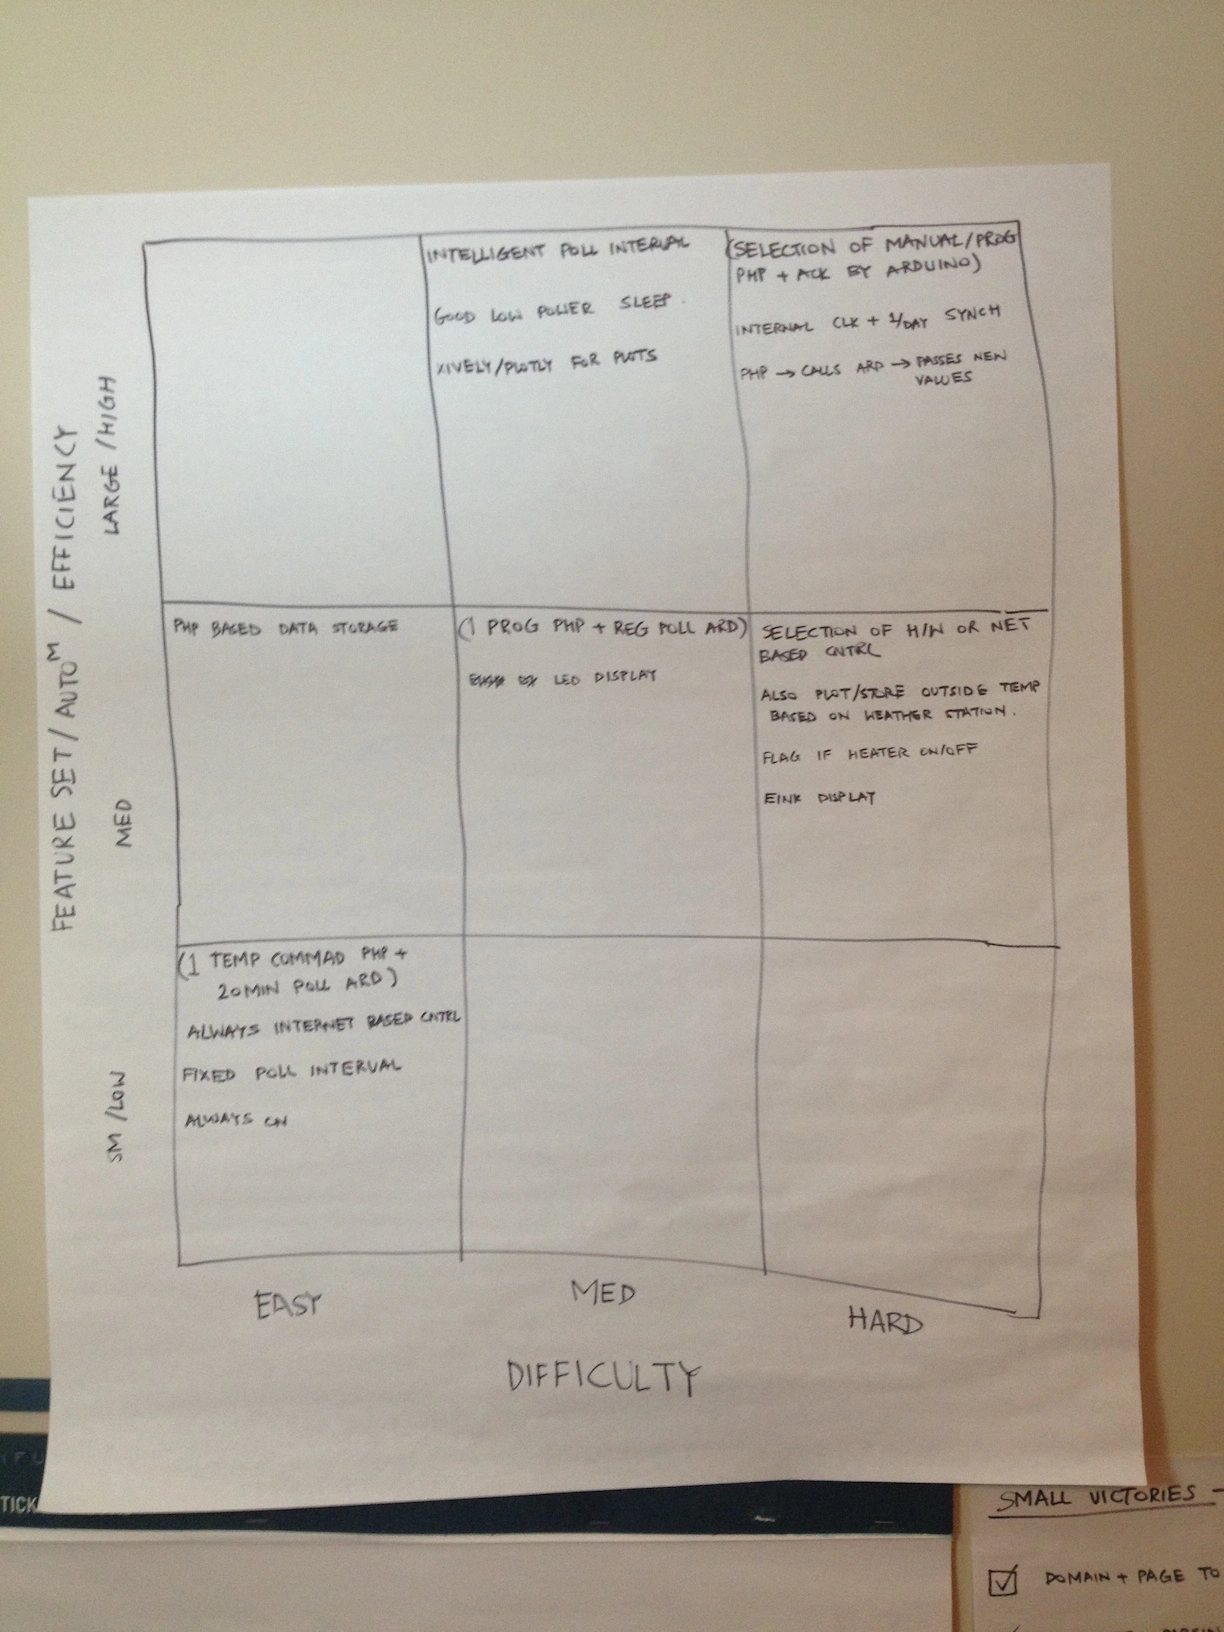
Planning This Thing Out
I only had 3 days to go from idea to working hardware, so I had to be smart about it:
- Brainstormed all the cool features I wanted
- Used a 9-box matrix to plot features by difficulty vs. usefulness
- Started simple: Focused on the “easy to implement” stuff first
The 9-box technique is actually pretty awesome for this kind of planning. Breaking everything into “small victories” made the whole project way less overwhelming.
The Mechanical Challenge (AKA the Fun Part)
The Problem
How do you connect a servo to a thermostat without any proper tools or permanent modifications? This turned out to be way trickier than the electronics!
My Options
- Build a 4-bar linkage
- Try some kind of belt/pulley system with rubber bands
What Actually Worked
I went with the 4-bar linkage using a bent paperclip as the connecting rod. On the thermostat side, I MacGyvered a pin joint with a cotter pin setup.
Here’s the nerdy part: I actually photographed the whole assembly and used ImageJ to measure distances and angles. Turns out 50°F to 80°F on the stat is exactly 90° of rotation—perfect for servo control!
The Software Side
Web Stuff
I used 99k.org to host my HTML and PHP code. The setup is pretty straightforward: - PHP generates a simple tdata.html file with the target temperature - Arduino downloads and parses this file - Xively handles the data plotting (super handy!)
Learning the Hard Way
Temperature Sensor Placement
Initially, I stuck the DHT sensor inside the plastic box. Big mistake! The thing was reading 3-4°C higher than actual temperature because of heat buildup. Moving it to the wall fixed that real quick.
Fitting Everything In
Getting all the hardware crammed into that little box was like playing Tetris, but I managed to position everything so I could still access the USB and power ports without opening it up.
See It in Action
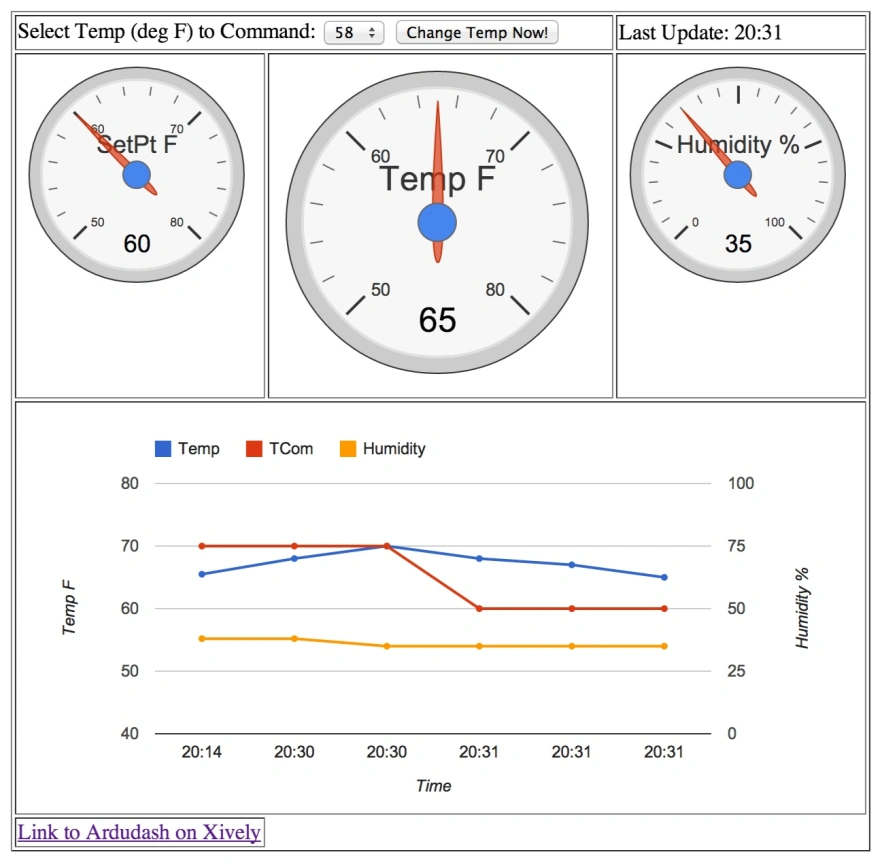
Round Two: Custom Dashboard
Why I Switched from Xively
I wanted more control over my data visualization, so I built a custom dashboard with gauges for temperature, humidity, and target temp, plus historical charts.
The Tech Stack
- Database: Free MySQL hosting on zymic.com
- Backend: PHP to talk to the database
- Frontend: JavaScript with Google Charts
- Inspiration: Shoutout to Fermentation Riot for the Google Charts idea
Reality Check
I’m definitely not a web developer, so this was all copy-paste-modify from Stack Overflow and tutorials. Took me 2 solid days to get everything working, but if I can figure it out, anyone can!
What’s Next
- Scheduling based on time of day
- Manual controls on the thermostat itself
- Smarter polling intervals
- Upgrade to DHT22 for better accuracy
Hard-Won Lessons
- Always use
servo.detach()after moving the servo (prevents annoying flutter) - Account for backlash in mechanical linkages—repeatability matters!
Get the Code
Everything’s on GitHub if you want to build your own: https://github.com/rsangole/Arduino-Thermostat-Project
Project Gallery